This program will apply a minimum or maximum filter to a cube.
Using the "max" option, the pixel with the highest DN in the NxM size boxcar will be
output. Using the "min" option, the pixel with the lowest DN in the NxM boxcar
will be output. With either option, more extreme DNs will be more
noticeable in the output image.
The boxcar will be N samples long by M lines high. Assuming a 3 x 3 boxcar
    		V1  V2  V3
		V4  V5  V6
		V7  V8  V9
the program will first substitute an extremely high or low internal value for ISIS.
This essentially zeroes out the process in such a way that one of the values in the
current boxcar will be supplied as the output pixel, instead of an output pixel from
a previous boxcar. Assume that the MAX option is being used on the model boxcar shown
above.This value is then compared to the first pixel in the boxcar. This would be
the value substituted for "V1". If V1 is greater than the internal value (this will
be the case unless V1 is a special pixel) then the new output pixel will tenatively
be set to V1. V1 is then compared to V2, and the greater pixel is again set to the
temporary maximum. This process continues until the temporary maximum is compared to
all of the values in the boxcar, at which point it is set as the output value.
Use this parameter to select the number of lines in the boxcar.
Higher values take longer, and intensify the results in the vertical
direction. The default value is three.
Use this parameter to select the number of samples in the boxcar.
Higher values take longer, and intensify the results in the horizontal
direction. The default value is three.
Use this parameter to choose the filter type. The possibilities
include min, which finds the lowest DN in the boxcar and max,
which finds the highest DN in the boxcar.
Type
string
Default
MIN
Option List:
Option
Brief
Description
MIN
Minimum filter
The minimum filter uses a variable kernel to find the pixel with the
lowest DN in the boxcar.
MAX
Maximum filter
The maximum filter uses a variable kernel to find the pixel with the
greatest DN in the boxcar
In this example the "lines" and "samples" are both 3, making a 3 x 3
boxcar. The minimum filter is selected, so as to essentially darken the
output.
GUI Screenshot
minmax gui
Example GUI
Screenshot of the GUI with parameters set to perform the minimum
filter with a 3 x 3 boxcar.
Input Image
The image before the filter
Input image before minmax.
Parameter Name:
FROM
This is the image as it was taken originally. Take note of the size
of areas with high DNs, such as on top of mountains and in the lower
right corner of the image.
Output Image
The image after the filter
Output image after minmax
Parameter Name:
TO
The filtered image. A side-effect of the program is a slight blur to
the image, but notice the change in the details described above.
the mountain tops have lost some area, while the dark region at the
base has expanded. Also note the reduced intensity of the brightness
in the lower right corner.
Example 2
Maximum 2x2
Description
Use the maximum option to enlarge bright areas (pixels with high DNs) and
shrink dark areas (pixels with low DNs).
In this example both the "lines" and "samples" options are set to 2. This
will make the program run faster than the 3 x 3 boxcar featured in
example 1. The effect of the filter will also be somewhat less dramatic
than with a 3 x 3 boxcar.
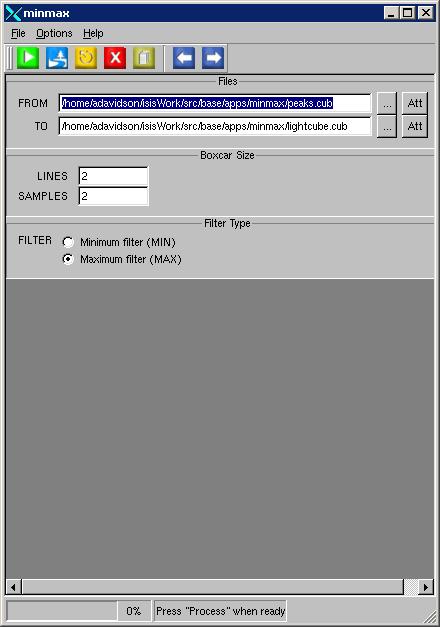
GUI Screenshot
minmax gui
Example GUI
Screenshot of the GUI with parameters set to perform the maximum
filter with a 2 x 2 boxcar.
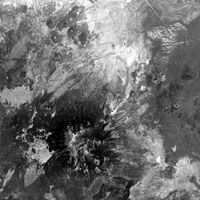
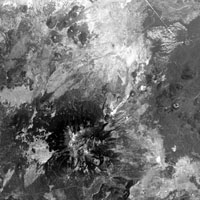
Input Image
The image before the filter
Input image before minmax.
Parameter Name:
FROM
This is the image as it was taken originally. Take note of the size
of areas with high DNs. In particular, notice the man-made lights
in the lower right corner of the image and the bright spots on top
of the mountain.
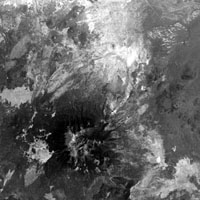
Output Image
The image after the filter
Output image after minmax
Parameter Name:
TO
The filtered image. Just as in example 1, the image is blurred
slightly. Unlike the first example, bright areas are now enlarged and
the brightness that would have been shrunk using the minimum filter
is now expanded. Again, note the peaks of the mountains and the
man-made lights in the lower right corner.